
Forum Replies Created
-
AuthorPosts
-
p.s. in my initial reply I missed that you said 3-ring pistons. Sorry.
John,
I don’t have instant access to my reference materials at the moment, but will look when I get a chance. In the mean time, you need to specify whether you need plain rings for chrome bores or chrome rings for plain bores? If plain bores, are they standard size or oversize? There is no longer a single source to order parts from since El Reno Aviation closed down.
Thanks,
Jim
-
This reply was modified 5 years, 3 months ago by
admin.
Wes,
Per the L-5 Parts Catalog the historically correct tachometer for the L-5E is the Jaeger Type C-11 (Spec. 94-27343). It looks like this –
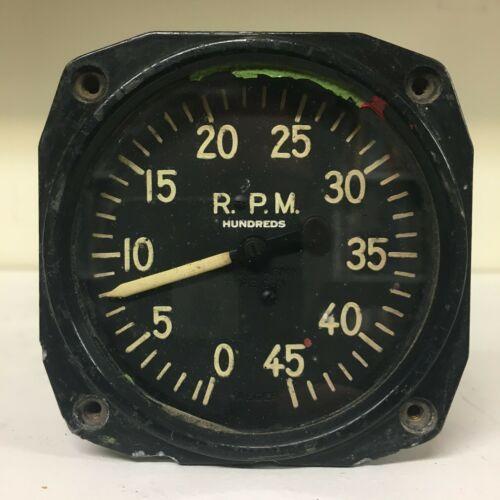
There’s nothing wrong with using the one you have if it hasn’t been damaged and you get it serviced after being oil-soaked. If you would like to install a C-11, contact club member John Seidts. He may still have some NOS tachs. They were used on many airplanes, including the P-40. His website is here: http://www.forgottenfield.com/amg/
Many people use recording tachometers instead. They aren’t correct from an authenticity standpoint but are useful for tracking engine time if you do not have a Hobbs meter. As delivered from the factory, the L-5’s didn’t have either and pilots simply recorded engine start and stop time from the clock.
If your cable is in good working order, no need to replace it. Do you have the original tach cable and housing assembly or an after-market replacement? If not, originals are not easy to find, but if you have the fittings from one any speedometer / tachometer repair shop should be able to build a new one for you. Unfortunately, since they were Government Furnished Equipment (GFE) along with the engine, there are no drawings available in the L-5 blueprint collection.
The tach cables generally don’t fail unless a wire strand breaks and the cable starts binding, or the tach itself fails and won’t turn up to speed. An oil-filled tack can cause that problem, as well as lack of lubrication. Periodic cleaning and lubrication of the cable is good practice and the tach should be cleaned and lubricated from time-to-time too.
As for the oil problem, there is a cork seal inside the tach drive housing about 1/2″ diameter and 1/4″ deep that is supposed to prevent oil from migrating into the drive cable and up to the instrument. Lycoming Part 60957. They are not easy to find, but it’s worth looking. I have a large number of them but cannot access my parts horde until I return to AZ from Alaska this fall. Sadly, I had some in my hands just a few days ago while on a visit to Phoenix. I may have sent John Griffin some extras a year or so ago, so you might ask him if he doesn’t see this post. You may substitute oil-proof O-rings and Sam Taber can help you with that. I’ve lost his info on part numbers but his Tabair phone # is (262) 642-4515.
Good luck,
Jim
.375-24 hex nut [STD-383-B] at Aircraft Specialties, $4.76 each. http://www.aircraftspecialties.aero/nut-375-24-hex-383-b/
STD-528 at Univair, $3.82 each. https://www.univair.com/engine-parts/lycoming/std-528-lycoming-nut/
Jan,
Lycon should have known better. The O-435 is no different than any other Lycoming opposed engine. The hardware is generic and you should be able to get them anywhere that sells aircraft hardware. Many repair shops keep them on hand but you should be able order them from Aviall, Lycon, Univair, Gibson, Superior, Aircraft Spruce, etc.
According to the manual, the sizes of the cylinder base nuts are 1/2″ and 3/8″, which are based on the stud size, not the wrench size. The original Lycoming part numbers are:
1/2-20 Original: STD-528 nut with STD-529 washer Modern: STD-5020 nut
3/8-24 STD-383-B nut with STD-39 washer Modern: .375-24 Hex Nut
[p.s. STD= Lycoming Standard per O-435 parts manual]
p.s. There wasn’t a single finish color except perhaps in the cases of aircraft that came out of major overhaul. Stinson used multiple sub-contractors and they all had different versions of interior green top coat and yellow-green [actually black-green] and yellow primers. Some mixed them in-house and some bought them pre-mixed. Depending on the substrate, the primer, the thickness of primer, and the topcoat, if any, there was a virtual rainbow of greens in an L-5.
The Marine Corps also had their own variations as we’ve seen and several surviving OY’s that went through Cherry Point. so, it depends if you want to try and depict that or a factory-fresh look. For example, I have a pile of spare unadulterated-by-civilians window frames and there are at least two distinct factory greens and the Cherry Point green, and one other I haven’t identified. I took a bunch of pics showing this but they’re still on my phone. I’ll post them once they’re downloaded.
Duncan cameron, Bill Tromblay and others have put a lot of effort into discovering and duplicating the Navy / USMC / USCG way of doing things, so hopefully they will be prompted to chime in here.
JG
-
This reply was modified 5 years, 7 months ago by
Bill,
I”ll have to dig for that but Mike Kennedy has been doing a really nice interior restoration and has it pretty much nailed. He has sent a bunch of pics and a write-up that I need to post here for the benefit of everyone who doesn’t have the time or resources to strip the fabric and start from scratch. Here’s one of his pics. Standby and I’ll try to get the other info posted by tomorrow night.
JG
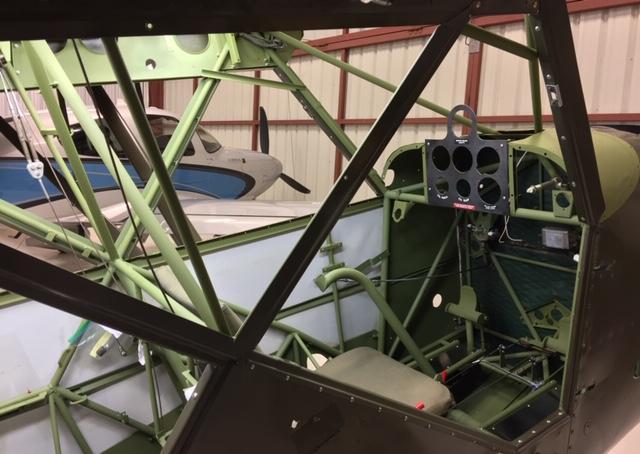 OY-1 / L-5E BuNo 03957 Mike Kennedy – Joe Hughes Atlanta GA
I’m curious to know why you’re doing that Jan, and when you do, what sort of duct is between the carburetor heat air box and air filter plenum? On the G-model it was a flexible rectangular part that is, of course, unavailable. That’s the 76-52039 cuff assembly that is shown in the parts catalog. On my version that has the G-model parts in it, that’s shown on Figure 34 on page 56, part no.14.
Over the years most of these have succumbed to deterioration. The cuff itself is 76-52039-2 between the mounting plates. If your plane still has the original, remove it very gingerly. If anything is going to cause you trouble, that will. When I bought my G-model project that part had partially collapsed into the air flow and little bits were flaking off. Had I run the engine that way, a lot of debris would have been ingested into the engine.
I assume yours has been replaced, but with what?
-
This reply was modified 5 years, 3 months ago by
-
AuthorPosts
