
Forum Replies Created
-
AuthorPosts
-
A battery box should certainly be used, particularly for a lead-acid battery so the fumes can be contained and vented overboard, which is part of the original design and therefore a mandatory airworthiness requirement. Even for other types of batteries, such as gel cells it’s a very good idea to keep them contained. I’ve seen those plunked in there on a piece of board and held down with zip ties, believe it or not.
There is a battery box drawing in the L-5 blueprint set, but alas it was for the prototype Model 76 and it’s way too tall for the production aircraft. It could be used as a starting point for designing a custom box though, but several changes would have to be made.
None of the commercially available boxes that I have seen are ideal and very few will fit in the rack properly; most being too big in at least one dimension. As far as I know, Odyssey only makes two suitable batteries that fit within the rack, so you might have to build a custom box for it. I prefer side posts and also don’t like the SAE top post design of the Odyssey batteries that will fit (at least those sold in the US).
For a bang-on authentic-looking restoration the ideal setup is to find the carcass of a vintage AAF battery, gut it, and use the casing as the battery box, which some modern batteries will fit inside. Several people have done that .
Example:
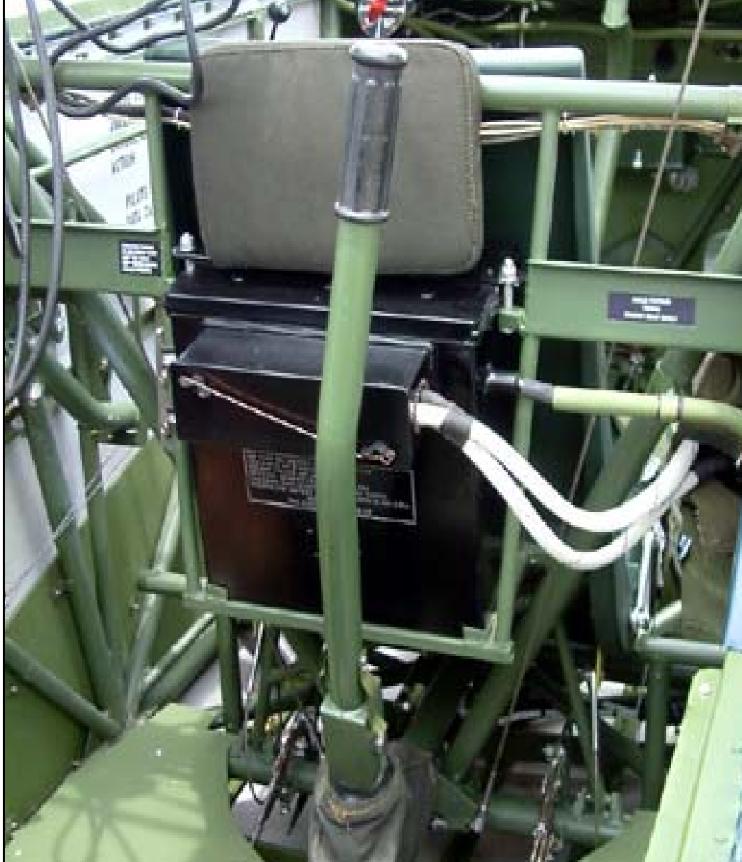
I have seen (and owned) several L-5 battery boxes that were either of military manufacture (probably Navy), or provided by a contractor in the late 1940’s or 1950’s . These have lids with tabs that work with the hold down lugs in the aircraft and were made to fit the L-5 battery rack. I have at least one of those that I’ll be happy to photograph for you when I’m next at my hangar. I used t have one from a Stinson 108 that worked okay, but it required a bit of modification.
Custom building a box is usually the best option, which is probably not what you wanted to hear. I shouldn’t assume that your battery rack hasn’t been modified because that might dictate what you’re able to use.
-
This reply was modified 2 years, 7 months ago by
admin.
The answer to this question appeared in the L-5 Newsletter several times in years gone by, and it may also have been mentioned here or in the other SOPA forum at Groups.io. However, I don’t suppose many people have time to sift through those resources for all the good maintenance and restoration tips they contain, which is an admission that I should have gathered all that information together in one place and indexed it long ago. The PDF’s of the newsletters can be easily word searched which speeds up the process, should you ever be so inclined to look when this half of the world is (or should be) asleep and you’re in a hurry for an answer.
Anyway, the best substitute for the original part is an automotive item made by Au-Ve-Co of Covington Kentucky. Their part number is 3664545 and the buttons are sold through auto part vendors such as NAPA. They are also sold under General Motors part # 4237. You can probably get them in Oz but they can be ordered from Amazon here: https://www.amazon.com/Auveco-Au-Ve-Co-4237-Rubber-Bumpers/dp/B001Q5GFIY However, they’re a bit thicker than the originals so if they interfere with the fit here or there you may need to grind the faces down a bit using wet-or-dry sandpaper and some water to keep the paper from being gummed up.
-
This reply was modified 2 years, 9 months ago by
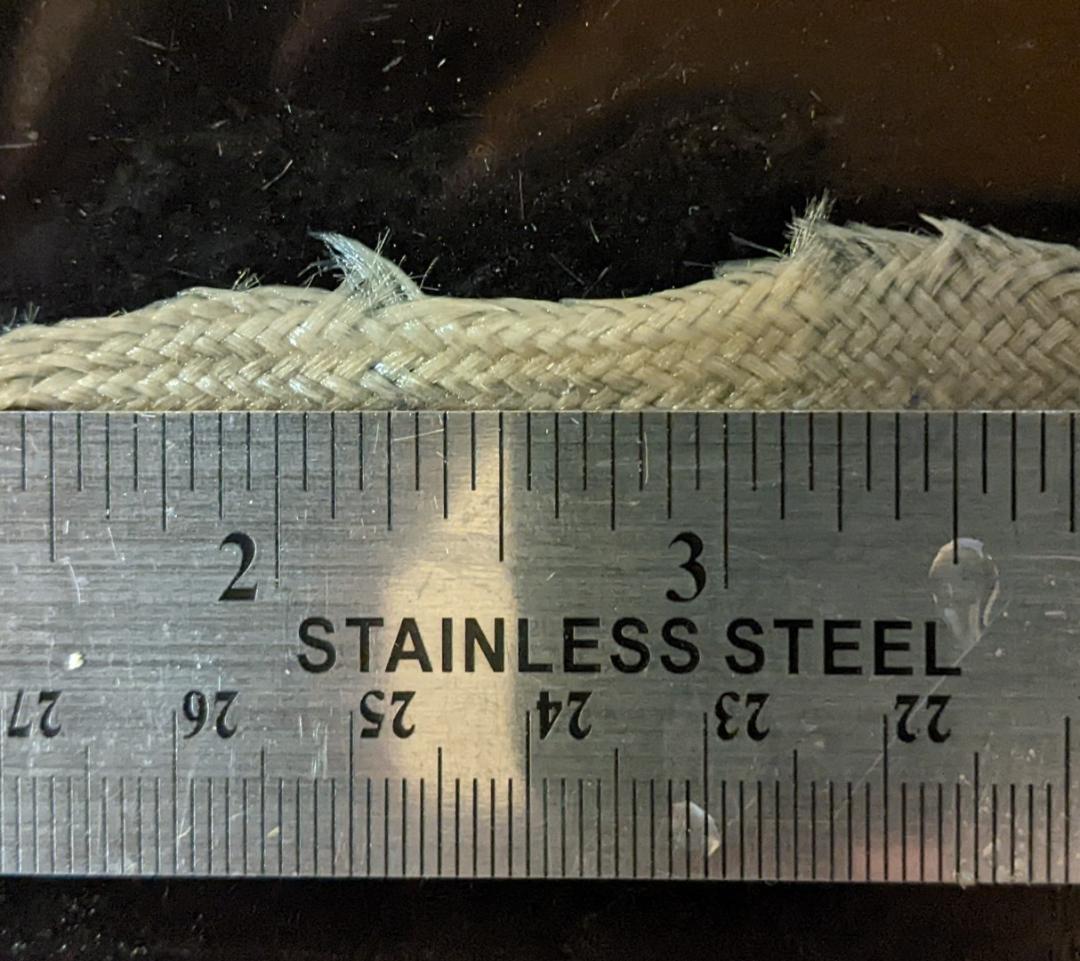
I managed to find a bit of original L-5 harness wire with the braided cotton sheath still intact – brittle but holding together. Finished diameter about 3/16″ and no color woven into it. I carefully slit it down the middle and then clipped off a short piece to photograph. As you can see, it’s woven on a bias and the angle appears to be 45 degrees. I was careful to keep it in a fully relaxed state and the count appears to be 14 strands per inch.
I’ll see what I can do Craig. I’m presently in Phoenix where my pile is but am heading back to AK on Sunday. I have to go to my hangar before I leave anyway, so I’ll see if I have anything that isn’t crumbling to dust. What gauge wire? Are you thinking of having some made or just looking for off-the-shelf?
JG
Nice Matt, but with my aging eyes, in bright sunlight, I’d probably need a magnifying glass to read that display!
Interesting bend in the rear throttle rod. Makes sense but not original. I wonder when in its life that was done?
But the stencil doesn’t say “Do Not Stand!”

That’s too bad Bill, sorry to hear they’re still leaking. Given your experience I’m sure that you have checked, but it sort of sounds like the barrels are pitted or worn beyond limits. I also assume that you re-used the original pistons, as required, because those in the Raybestos kit will not work properly.
Anyway, the answer to your question is that, yes, others have replaced their master cylinders with various Cleveland, Grove, and Bodell models (that I know of), and maybe even some reservoir types (which I’m not aware of), but the problem with all of them is there’s no bolt-in solution, so mounting adapters are required. Not a big deal, but you also lose the parking brake, which sort of is, I think.
I’m not in favor of deleting the parking brake because it’s probably not technically legal to disable a system the plane was certified with. I’m certainly not an expert when it comes to brakes or whether the old CAR 4a certification standards the T.C. was approved under makes any difference, but Part 23 certainly requires them.
Sam T. or somebody can probably tell you whether they can be re-sleeved or not, but my hazy memory is saying there may not be enough meat on them for that to work.
That’s great, Ed. I’m glad the actual repair turned out to be less traumatic than not knowing what you would find before you removed the tank.
Steve Dennis hardly has anything. A year and a half ago I got pics of his meager inventory and bought a few parts. Most is in very poor condition or not L-5 except the frame and gear legs, and he did have a pair of oleos but I’d be surprised if they haven’t sold. It’s worth a call or email though. He’s in Rice Lake WI. Home 715-234-7613. Mobile 763-453-1378. Email: dennisaeroventures@yahoo.com or
I have a set of 108 oleo struts but have not taken them apart. The barrels are the same diameter but 1 inch shorter, and at full extension the same-diameter piston shafts are 1-3/4″ shorter. The 108 gear legs are shorter too and they swing through a smaller arc, so all of this suggests that the springs are also shorter. They might be stiffer in order to handle the same amount of weight, however, but all of this is guesswork so I’ll just have to disassemble one and find out.
Three choices:
(1) hunt for a used oleo and hope that it has a spring that still meets the dimensional and compression tolerance (or at least matches one you already have)
(2) get a new matched pair made. Many years ago, before I found a spare oleo to rob for parts, I looked into having some new coil springs made and the manufacturing shop I talked in Phoenix wouldn’t do a run of less than ten at a time for something like $2500 for the lot. The prices may have gone up considerably because that was 15 years ago. That said, with the proliferation of custom shops for off-road vehicles and motorcycles since then, maybe the price hasn’t changed too much. In any case, expense is a function of the time it takes to set-up the equipment, rolling the coil, grinding the ends to spec, plus heat-treating , shot-peening, and cadmium plating. Obviously there’s an economy of scale involved.
(3) get the ailing spring “reset” to the correct height. I have read differing opinions on the efficacy of getting the spring length reset, but the main issue is whether the L-5 oleo springs were hot or cold drawn, and I do not know the answer. I do know that only hot-rolled springs can be successfully reset and that the cost is on the order of 1/4 to 1/3 the price of having one custom made depending on the required finish. A little internet research suggests that in the automotive industry, SAE 6150 steel (from which our springs were made) is usually cold drawn, so resetting is probably not an option, leaving #1 or #2 as your choices.
Anybody else have input on this, please?
-
This reply was modified 3 years, 5 months ago by
I just sent you a personal message. JG
Thanks for posting the start-to-finish chronology of your restoration with photos Matt. It is certainly one of the nicer Sentinels now flying. Congratulations. I hope others will be inspired by your hard work.
Dan,
That’s the incorrect transmitter for your L-5. You need the AVT-112. Only the first 275 aircraft used the AVT-115. You also need the AVR-20A receiver and AVA-126 power supply. Those were the basic three for every L-5 from 76-277 through 76-3476.
JG
p.s. for those wondering about 76-276, that # was skipped since that airframe was used for destructive testing
-
This reply was modified 2 years, 7 months ago by
-
AuthorPosts
